
Electronics/Robotics 10
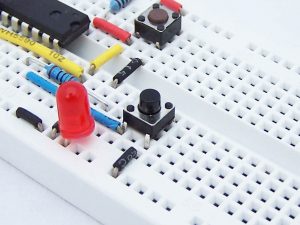
Electronics/Robotics 10 is a 2 credit course designed to introduce students to the world of electronics & robotics. The course will run every other day for the first semester (approx. 60 hrs). Students will begin by breadboarding simple circuits and in doing so will learn what some of the more common components do. Arduino ‘microprocessors’ will be introduced which will allow for the exploration of programmable electronic control. Projects will follow utilizing skills learned along with introducing students to manufacturing processes.
Below you will find a number of resources and materials that will be used for the course. Also, look under Resources on the Electronics Drop Down Menu for additional information on electronics.
Where to begin?
Follow this link to the answer to this very question!
- Intro Labs
- Arduino Microcontroller Labs
- Useless Box Project
- Otto Robot
Introduction to Arduino and the Arduino Nano Microcontroller
Arduino Lab – Getting Started – a general discussion/introduction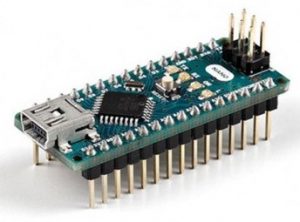 Arduino Lab 1 – Blink – a basic exercise to create a foundation of understanding
- optional enrichment: mixing colours with RGB LED’s
Arduino Lab 2 – Call Funtions 5 LED Sequence – 5 LED Sequence/Call Function
Arduino Lab 3 – If Statements And Variables
Arduino Lab 4 – LCD
- optional enrichment – curious as to how LCD screens (like a TV) produce amazing images? Yes, then watch this.
Arduino Lab 6 – Servo Random Movements
- Download the randomMovement ‘zip’ file. Open the file and ‘copy’ then ‘paste the ‘.ino’ arduino file to your class storage location (OneDrive)
- Open the file in the Arduino IDE and upload it to your breadboarded servo circuit (check pin assignments!)
- Observe the servo operation, then understand what is happening in the program to make these movements.
- Lastly, adjust the program to make other movements (example) that may be used in a useless box scenario.
- Show your working servo and program to your teacher to receive credit.
Arduino Nano – Hardware Reference
.
Useless Box Project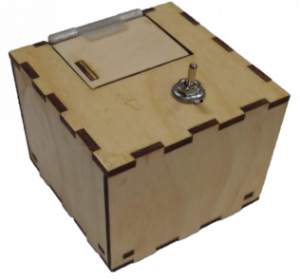
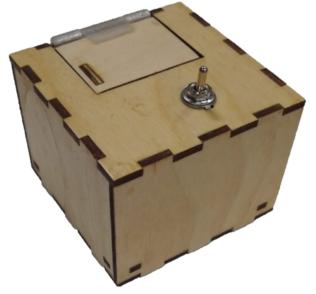
The Useless Box is a simple and fun little project that teaches students the various processes/stages of taking a project from conception to completion. Students will breadboard the circuit, program an Arduino Nano to make the circuit work, create a printed circuit circuit board, design a case in Inventor, 3D print the case and finally assemble it all together to create a professional looking project.
Project Procedure
Designing the Circuit Board using DipTrace
the
Location of DipTrace Libraries…use ‘File Explorer’ to navigate to:
‘This PC’ > ‘SchoolShare’ > ‘Maker Wood Studentz’ > ‘Electronics 10’ > ‘Useless Box’ > ‘diptrace libraries’
- Making the Schematic for the Useless Box
- Updating your schematic – Arduino Nano…
- You will not be using the ATTiny microcontroller for your project this year. We will be using the Arduino Nano and you will need to make the necessary changes to the schematic you created in step one. USE THIS DOCUMENT for reference when doing so. Once done, print and submit your schematic for approval to proceed.
Making the PCB
- Follow the Useless Box project procedure – Electronics Portion, to make your project PCB
- Use a Dremel drill press to drill all holes
- Obtain and solder in all components (solder practice to be completed and submitted first!)
3D Print The Servo Finger And Door Hinge
You will need to 3D print a servo finger to turn off the switch. Download this ‘.stl’ file.. fingerUpdated v1
- the file is ‘zipped’ and you will need to open the ‘.zip’ file, then copy the ‘.stl’ file found inside and paste this file to your project folder location
You will also need a 3D printed hinge for the door. You can get this from your teacher.
Setting up the 3D Printer/Printing
Cutting The Box Parts
- On your computer open Universal Laser Systems ‘UCP’ (User Control Panel
- Near the top of the UCP is a folder icon – open it
- Choose ‘Import’ and navigate to “H” Drive (the shared drive) and the folder ‘Maker Wood Studentz > Electronics-Robotics 10 > Useless Box’
- Select/open folder ‘Project Case Laser Files’
- ‘Open’ the appropriate ‘.emf’ file, then choose ‘Select’ (you should now see the parts in the UCP)
- Obtain a piece of 1/8″ (3mm) Baltic Birch plywood – at least 8″ x 8″
- Take your computer to the laser.
- Prepare the laser to cut your material
- Focus the laser to the surface of the material
- Ensure the material is placed such that the cut will be on the material
- Turn on the air supply for the nozzle (red and yellow valves on the wall)
- Turn on the fume extractor
- Run the laser
**Note – if a part fails to be fully cut, individual parts can be found in the subfolder
Assembling the Box
- Open this document and use a pencil to transfer all assembly labels to the pieces EXACTLY as shown.
- Block sand the faces (not the edges) of all parts (do not sand the sides labelled in step 1) to remove residue/smoke from cutting.
- Have your teacher spray a clearcoat on all sanded surfaces
- Once dry, LIGHTLY sand the clear coated surfaces to remove raised grain, then have your teacher clearcoat the surfaces again.
- Test fit the box parts. The fit should be snug.
- Identify the key areas to be glued (no, the whole box doesn’t need glue – and definitely NOT the bottom!)
- Use a small paint brush, or reasonable substitute, to apply glue to key areas as you assemble the box. WASH THE BRUSH IMMEDIATELY AFTER THIS STEP!!!
- Allow time for the glue to dry (minimum 1hr)
Final Assembly
- Use either the screws that came with your servo, or #4 x 1/2″ wood screws, to attach the servo to the servo bracket.
- Use a small amount of glue (get from the teacher) to attach the hinge to the box.
- Assemble all components inside being careful to avoid interference with the servo/finger operation.
- Attach the bottom to the box using #4 x 1/2″ wood screws
Knowledge Base
How to setup a power supply (youtube)
How to Breadboard (youtube)
Resistor/LED explaination (youtube)
Basic component explaination (youtube)
THEORY COMPONENT
Basic Electricity (voltage, resistance, current) – Powerpoint
- video – What is Current? (Youtube)
- video – What is Voltage? (Youtube)
- video – What is Resistance? (Youtube)
Electronic Components – Powerpoint
Resistor Colour Code – Powerpoint
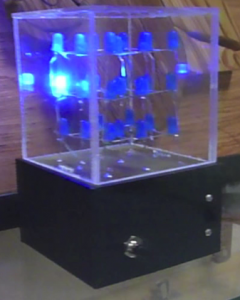
3 x 3 x 3 LED Cube (Level 2)
LED Cubes are fun to make and can be mezmorizing to watch. Sizes can range from the minimal 2 x 2 to extremely large. This 3 x 3 cube you will make involves 27 LEDs and is simple enough to qualify as suitable for a first effort, but complexed enough to be interesting when completed.
Navigate to this page to begin building your cube.
OTTO (Level 1 and/or Level 2)
Completed the Useless Box? Yes! Then it’s time to build Otto.
Head to Otto’s page by clicking THIS LINK